هذا الشكل النهائى للتأثير
Create the Background
Step 1
Install the Damask pattern by double clicking it.
Step 2
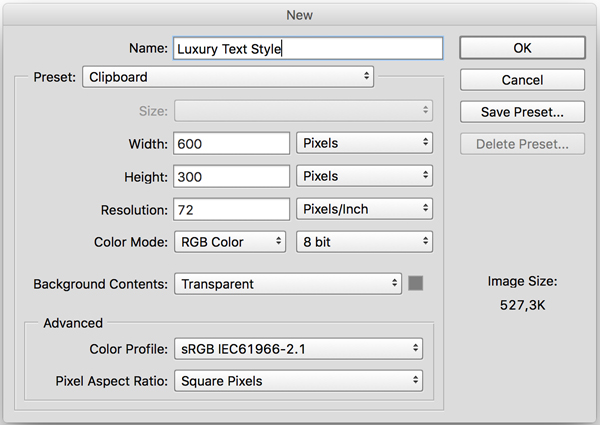
Create a new document (File > New) and set the Width to 600 px, the Height to 300 px and the Resolution to 72.
 Step 3
Select > All, then Edit > Fill and pick White from the drop-down list. Then Select > Deselect. Let’s rename the layer (Layer > Rename Layer) to Background to keep it nice and clean.
Step 4
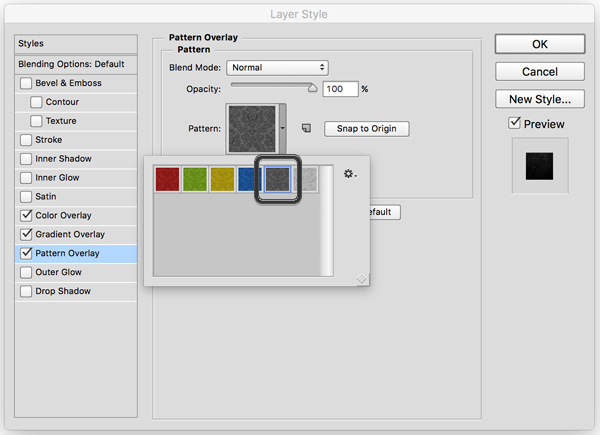
Now double-click the
Background layer to enter
Layer Style. You’re going to add a
Pattern Overlay. From the drop-down list, select the dark gray Damask pattern.
 Step 5
Now add a Color Overlay with the following settings:
- Blend Mode: Vivid Light
- Opacity: 2%
- Use the color #000000
 Step 6
Then you’re going to add a Gradient Overlay with the following settings:
- Blend Mode: Overlay
- Make sure you tick Reverse
- Style: Radial
- Angle: 0
- Scale: 150%
Click the Gradient box to create the gradient. Click each color stop to modify the Color and use the colors #060606 to the left and #3c3c3c to the right.
 Step 7
While you're still in the
Gradient Overlay section, click on the canvas and hold while dragging upwards to move the gradient. You’ll see it gives the background a nice soft light that spreads from the top.
 2. Create the Text and Add Effects
Step 1
Install the Webtreats pattern by double clicking it.
Step 2
Install the font Great Vibes. Then back in Photoshop, create the text by typing Luxury or something else of your choosing and select the font you just installed (it’s called Great Vibes Regular in the font list). Set the size to 200 pt. It doesn’t matter what color you choose because we’re going to add a lot of effects that’ll cover it.
Step 3
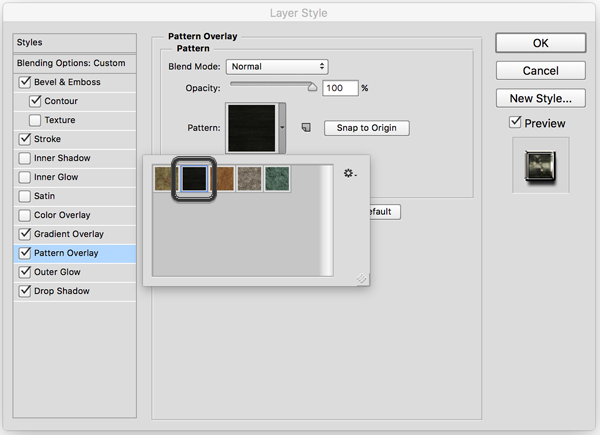
Double-click the
Luxury layer and let the fun begin! Under
Pattern Overlay, add the black pattern from the Webtreats pack. Unfortunately, it doesn’t have a unique name, but luckily all the patterns have different colors, and you’re going to use the only black one there is. It’ll add a dark stone pattern to the text:
 Step 4
Add a
Gradient Overlay to the mix, so the text comes to life:
 Step 5
To make the text pop, add
Bevel & Emboss with the following settings. Make sure the
Gloss Contour is the one called
Ring – Double.
 Step 6
Then add some
Contour to adjust the
Bevel & Emboss. Make sure the
Contour is called
Gaussian.
 Step 7
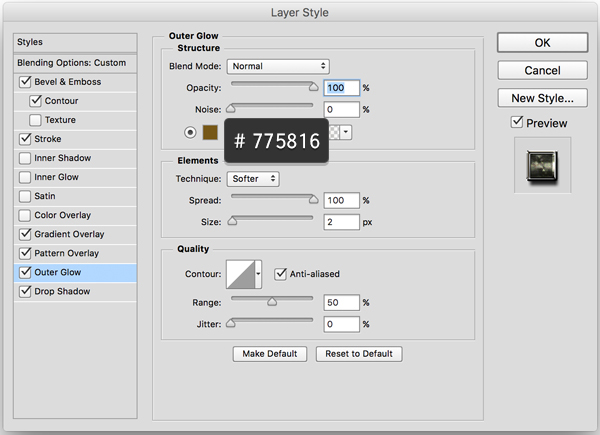
Now frame the whole text with a golden border by adding an
Outer Glow:
 Step 8
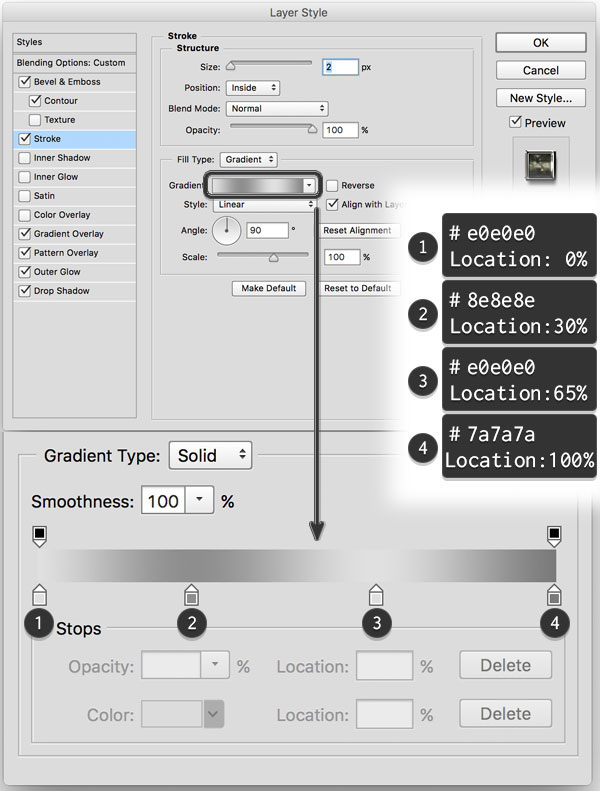
By adding a silver
Stroke to the text, you’ll make it shine and stand out even more:
 Step 9
Lastly, add a
Drop Shadow to separate the text from the background:
 Step 10
Hit OK and you end up with a shiny new text effect.
3. Save the Text Effect for Future Use
Step 1
But of course you’ll want to save the effect so you can use it over and over again on other text or objects. If you take a look at the
Styles panel, you’ll notice the small icon that looks like a piece of paper with a folded corner. Click on it to add the style to your active styles and give it a memorable name.
 Step 2
You still need to save it to the library, so go ahead and click on the small drop-down icon and then Save Styles. Save it anywhere you want, although I recommend saving it in the Photoshop folder:
- Location of the Styles Folder on Windows: Program Files > Adobe > Adobe Photoshop(your version) > Presets > Styles
- Location of the Styles Folder on Mac:Programs > Adobe Photoshop (your version) > Presets > Styles

مع تحياتى