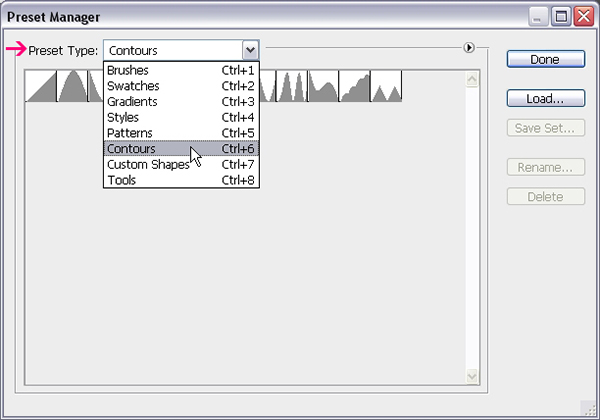
Loading the Contours
You might need to load the Contours used in some of the Layer Styles below. To do so, go to Edit -> Preset Manager, and choose Contours from the Preset Type drop down menu.
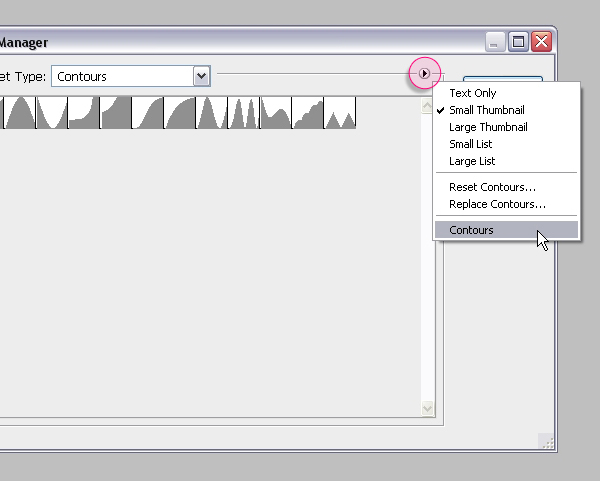
Click the small arrow in the top right corner, and choose Contours.
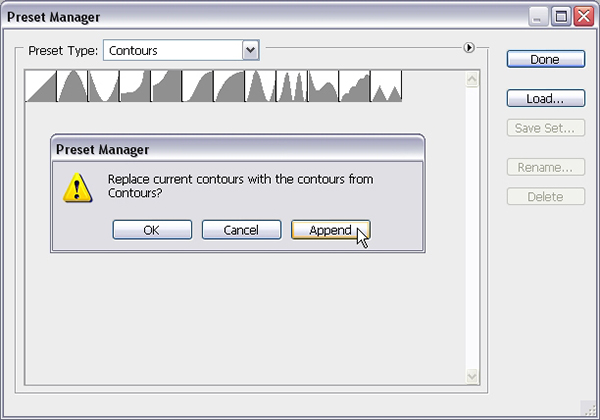
Click Append to add the new contours to the existing ones.
Step 1
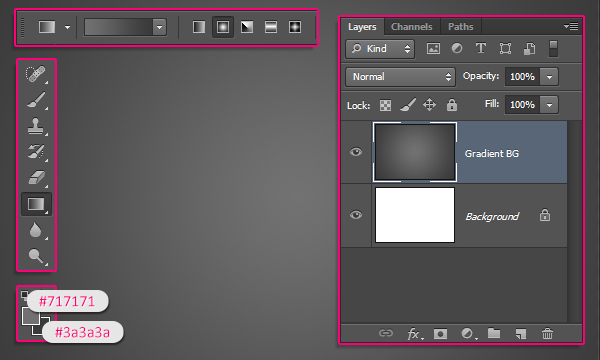
Create a new 1100 x 750 px document, and create a new layer on top of the Background layer, then call it “Gradient BG”. Set the Foreground color to #717171 and the Background color to #3a3a3. Pick the Gradient Tool, choose the Foreground to Background, Radial Gradient, in the Options bar. Then click and drag from the center of the document to one of the corners.
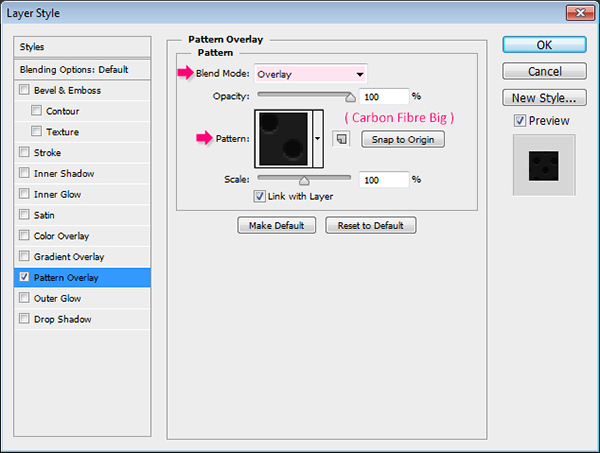
Double click the “Gradient BG” layer to apply a Pattern Overlay effect. Change the Blend Mode to Overlay, and choose the “Carbon Fibre Big” pattern (download link in the Tutorial Assets section).
This will add a simple pattern to the background.
Step 2
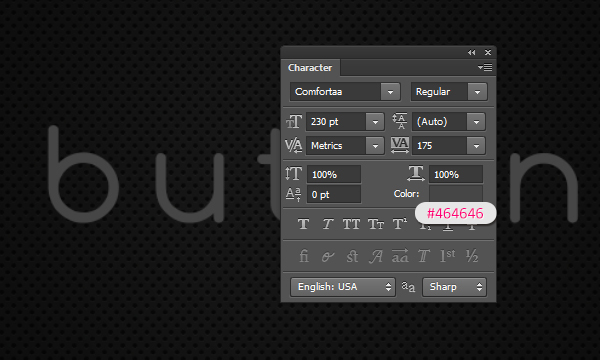
Create the text using the font Comfortaa. The font color is #464646, its Size is 230 pt, and the Tracking value is set to 175 to avoid any overlapping of the stroke that will be added later on in the tutorial.
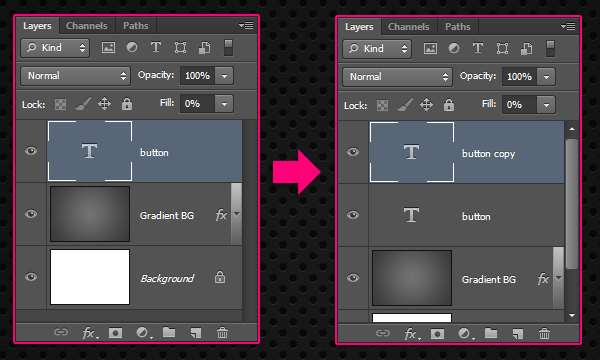
Change the text layer’s Fill value to 0, then duplicate it.
Step 3
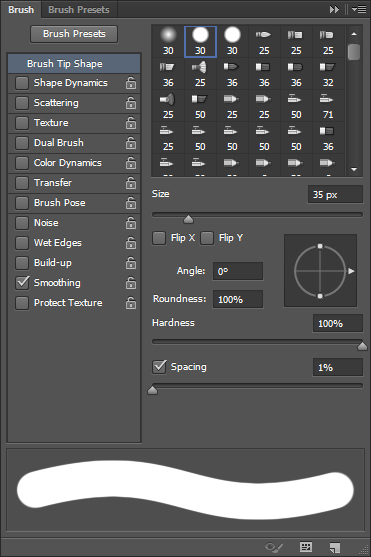
Pick the Brush Tool and open the Brush panel (Window -> Brush). Under Brush Tip Shape, choose a hard round 35 px brush, then set the Spacing to 1%.
Right click one of the text layers and choose Create Work Path.
Next, the text path will be stroked with different brush sizes. So each layer will be named according to the brush size used.
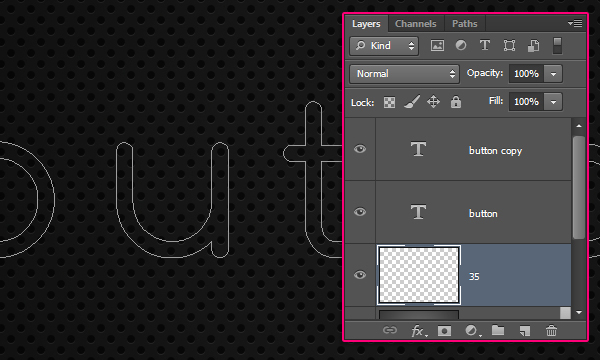
Start by creating a new layer under both text layers and call it “35″.
Set the Foreground color to #414141 and pick the Direct Selection Tool. Right click the path and choose Stroke Path. choose Brush from the Tool drop down menu and click OK.
This will stroke the path with the 35 px brush. Don’t get rid of the path yet.
Step 4
Create a new layer below the “35″ layer and call it “50″. Pick the Brush Tool, change the brush Size to 50 px, and the Foreground color to #363636, then pick the Direct Selection Tool and stroke the path like you did previously.
Hit the Enter/Return key to get rid of the path.
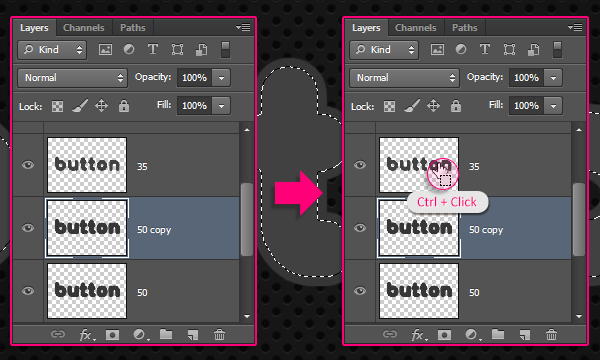
Duplicate the “50″ layer, then press and hold the Ctrl/Cmd key, and click the “35″ layer thumbnail to create a selection.
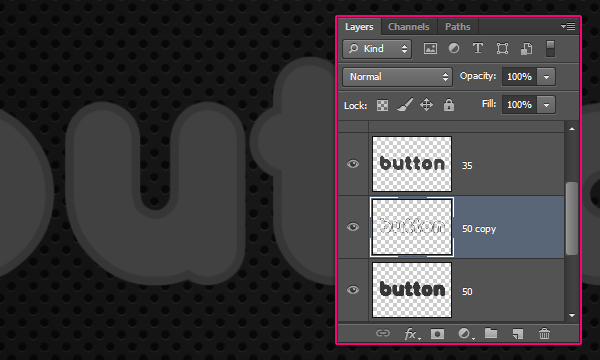
Make sure that the “50 copy” layer is selected, then press the Delete key to remove the selected part.
Go to Select -> Deselect (or press Ctrl/Cmd + D) to get rid of the selection.
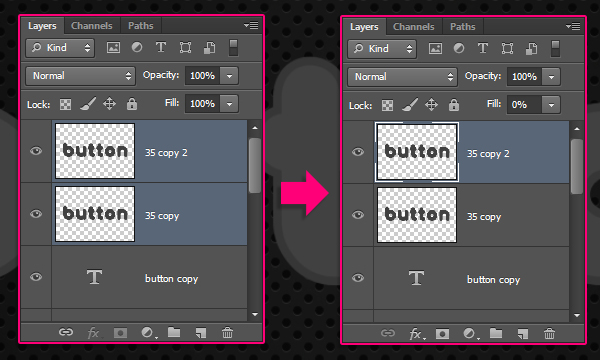
Duplicate the “35″ layer twice, then drag the two copies on top of all layers, and change their Fill values to 0.
Step 5
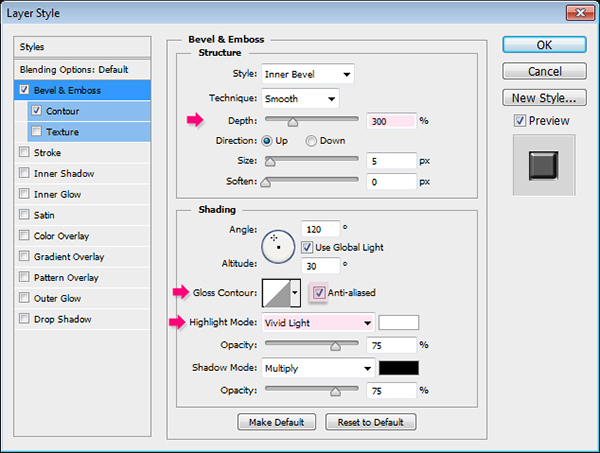
Double click the “50 copy” layer to apply the following Layer Style:
Bevel and Emboss: Change Depth to 300, check the Anti-aliased box, and change the Highlight Mode to Vivid Light.
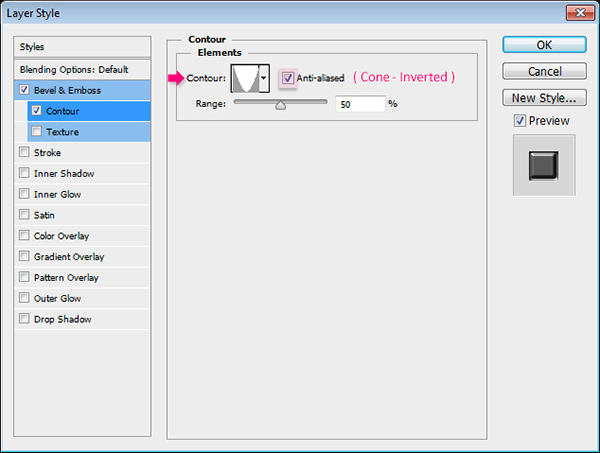
Contour: Choose the Cone – Inverted contour, and check the Anti-aliased box.
This will style the outer stroke part.
Step 6
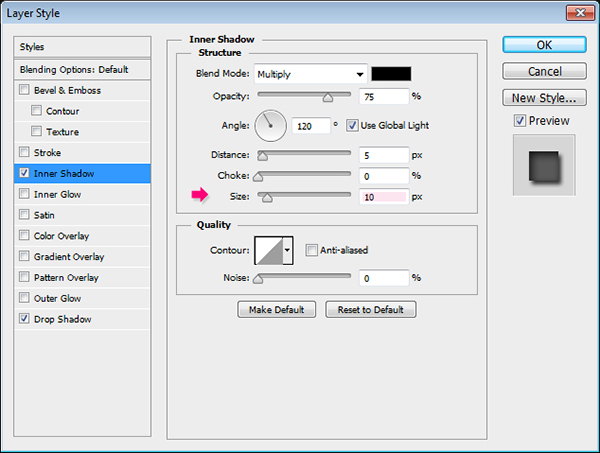
Double click the “35″ layer to apply the following Layer Style:
Inner Shadow: Just change the Size to 10.
Drop Shadow: Use the default values.
This will give the inner part some depth.
Step 7
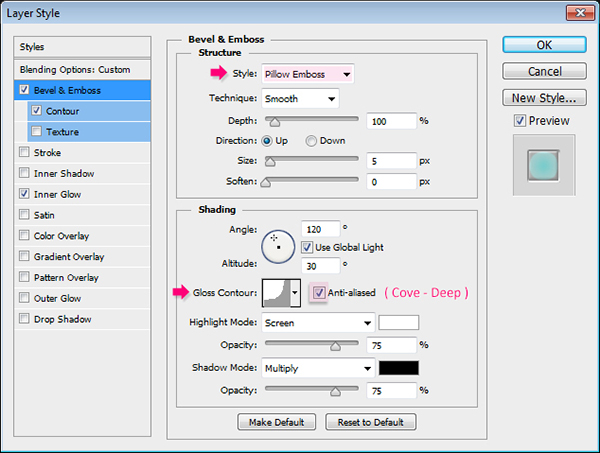
Double click the original text layer to apply the following Layer Style:
Bevel and Emboss: Change the Style to Pillow Emboss, the Gloss Contour to Cove – Deep, and check the Anti-aliased box.
Contour: Choose the Half Round contour, and check the Anti-aliased box.
Inner Glow: Change the Blend Mode to Vivid Light, the Opacity to 100%, the color to #33fffd, the Source to Center, and the Size to 16.
This will create the first layer of inner glow.
Step 8
Right click the original text layer, choose Copy Layer Style, then Right click the copy text layer and choose Paste Layer Style.
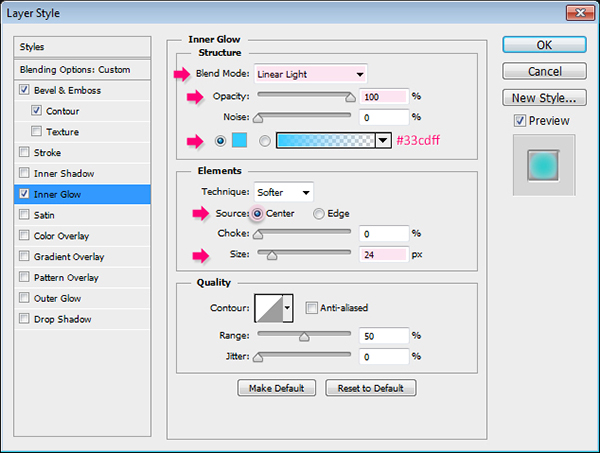
Double click the copy text layer to modify the Inner Glow effect.
Change the Blend Mode to Linear Light, the Opacity to 100%, the color to #33cdff, the Source to Center, and the Size to 24.
This will add another layer of inner glow to intensify it.
Step 9
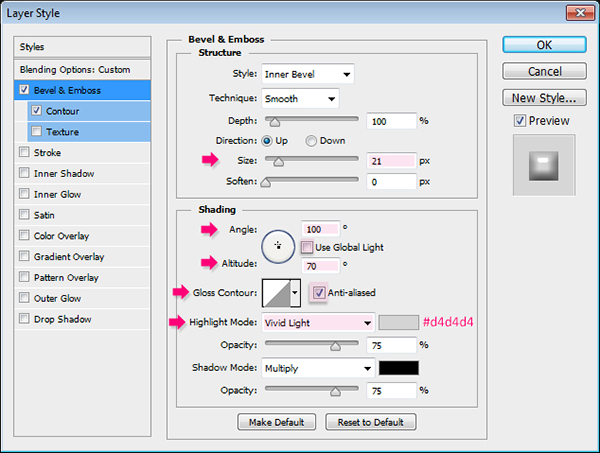
Double click the “35 copy” layer to apply the following Layer Style:
Bevel and Emboss: Change the Size to 21, uncheck the Use Global Light box, change the Angle to 100, the Altitude to 70, check the Anti-aliased box, change the Highlight Mode to Vivid Light, and its color to #d4d4d4.
Contour: Just check the Anti-aliased box.
This will make the effect look a bit 3D.
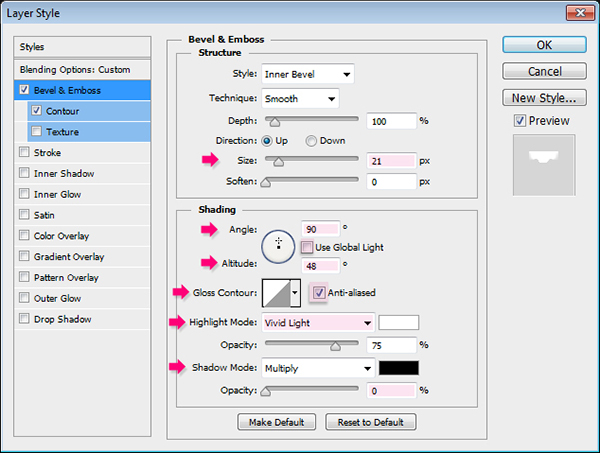
Step 9
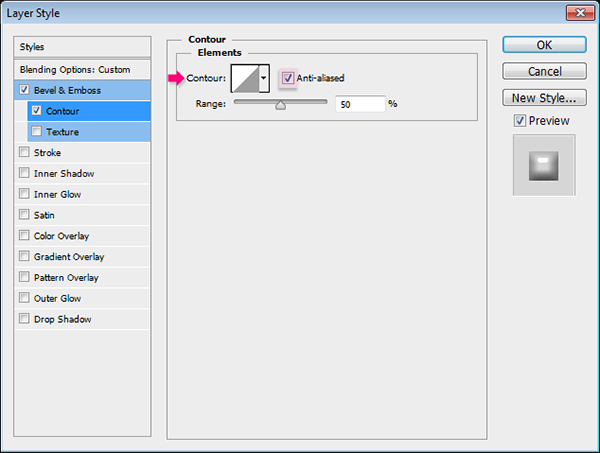
Double click the “35 copy 2″ layer to apply the following Layer Style:
Bevel and Emboss: Change the Size to 21, uncheck the Use Global Light box, change the Angle to 90, the Altitude to 48, check the Anti-aliased box, change the Highlight Mode to Vivid Light, and the Shadow Mode Opacity to 0.
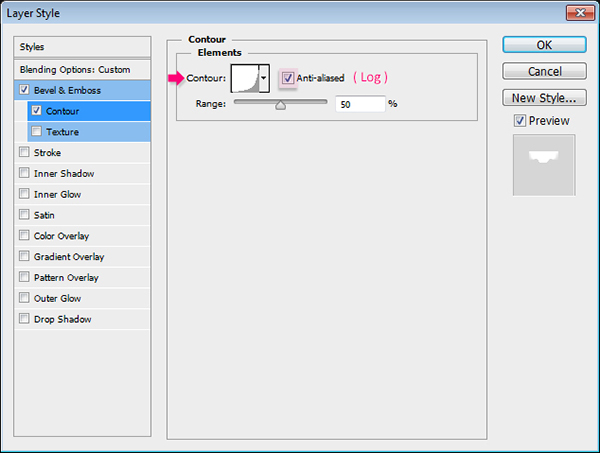
Contour: Choose the Log contour, and check the Anti-aliased box.
This will create the final 3D look, and add the glossy-shiny feel to the text.
Step 10
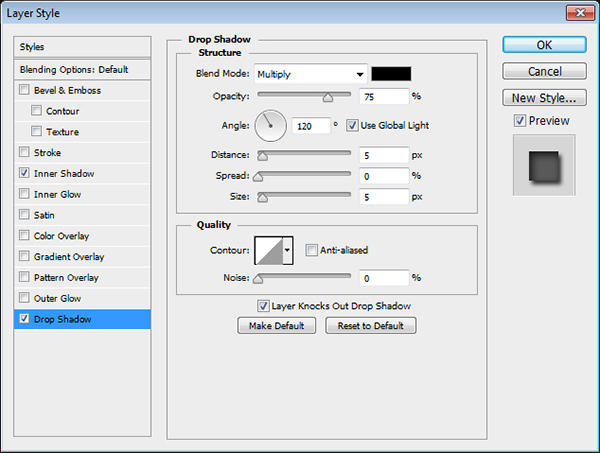
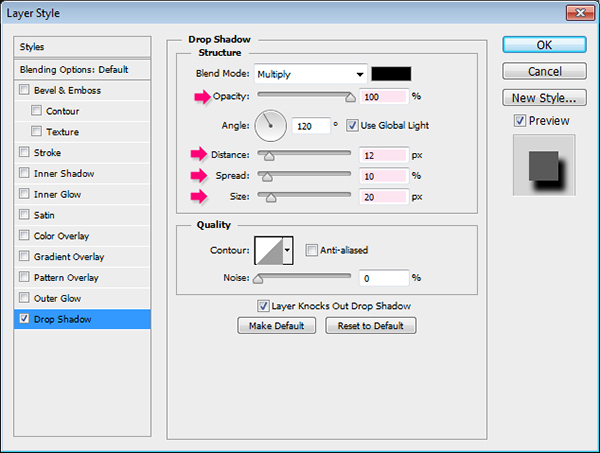
After all layer styles are applied, double click the “50″ layer to apply the Drop Shadow effect.
Change the Opacity to 100%, the Distance to 12, the Spread to 10, and the Size to 20.
By applying the drop shadow after all the other layer styles, you can adjust its values according to how it looks with them if needed.
Step 11
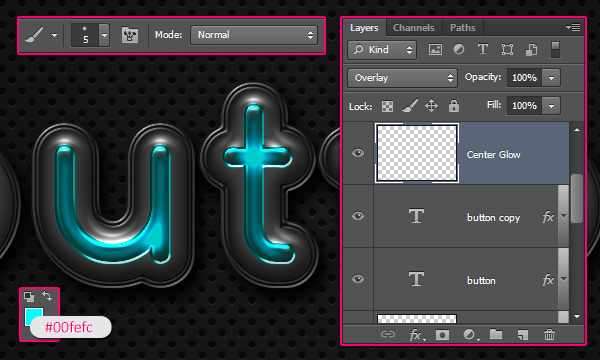
Right click a text layer and choose Create Work Path again. Create a new layer on top of both text layers and call it “Center Glow”, then change its Blend Mode to Overlay. Choose a 5 px soft round brush, set the Foreground color to #00fefc, the use the Direct Selection Tool to stroke the work path.
This will intensify the glow at the edges of the part in the center.
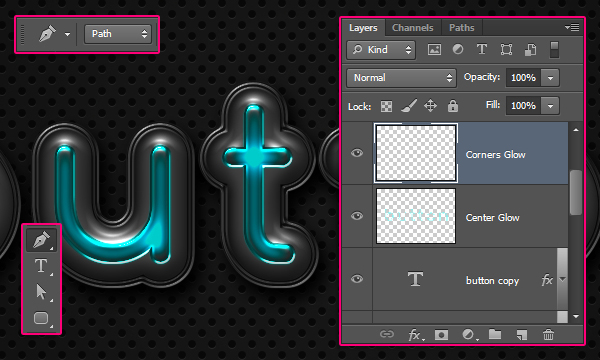
Create a new layer on top of the “Center Glow” layer and call it “Corners Glow”. Pick the Pen Tool, an choose Path in the Options bar.
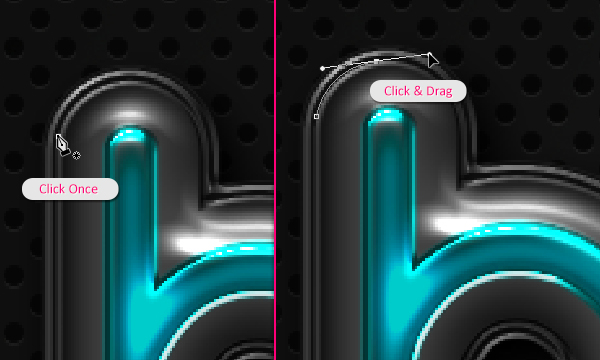
What you’ll need to do next, is draw small curves on top of some of the corners of the letters. Click once to add an anchor point, then click and drag to create the curve.
See the image below for reference.
When you create a path, you’ll need to Ctrl/Cmd + Click outside it before you can create another path somewhere else.
The image below shows where the paths were added.
Step 12
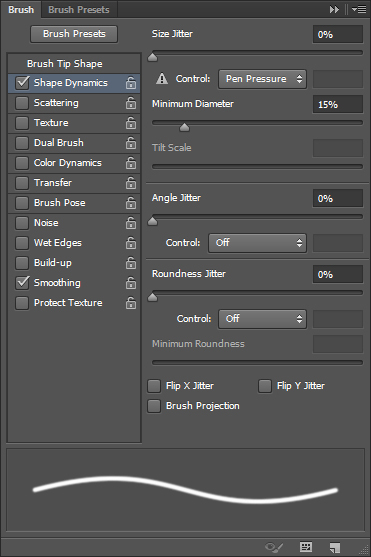
Pick the Brush Tool and open the Brush panel. Choose a soft round 5 px brush, then under Shape Dynamics, choose Pen Pressure from the Size Jitter Control drop down menu, and set the Minimum Diameter to 15%.
This will make the brush fade at both ends of the each path.
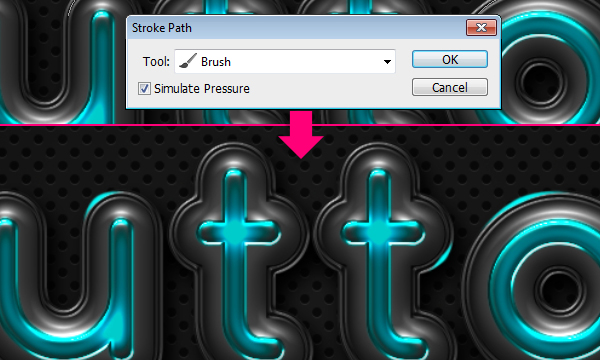
Pick the Direct Selection Tool, right click a path, choose Stroke Path, then check the Simulate Pressure box, and click OK.
Then, hit Enter/Return to get rid of the work path(s).
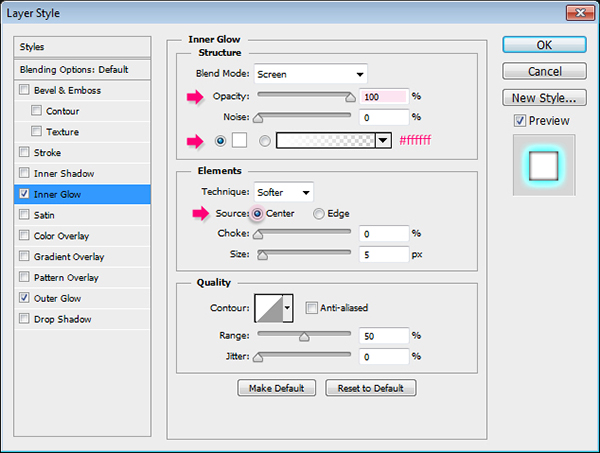
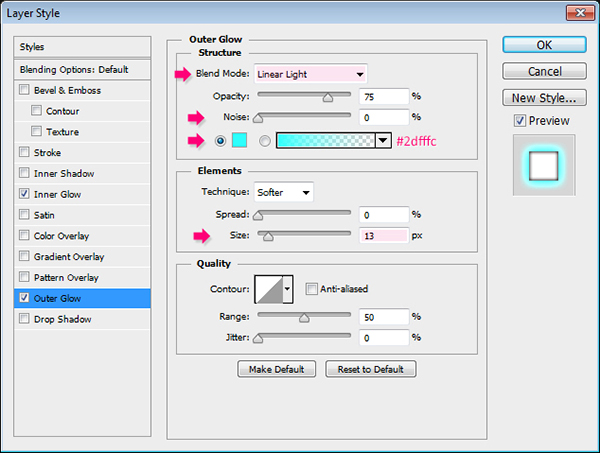
Step 13
Double click the “Corners Glow” layer to apply the following Layer Style:
Inner Glow: Change the Opacity to 100%, the color to #ffffff, and the Source to Center.
Outer Glow: Change the Blend Mode to Linear Light, the color to #2dfffc, and the Size to 13.
This will make the corners glow even more.
Step 14
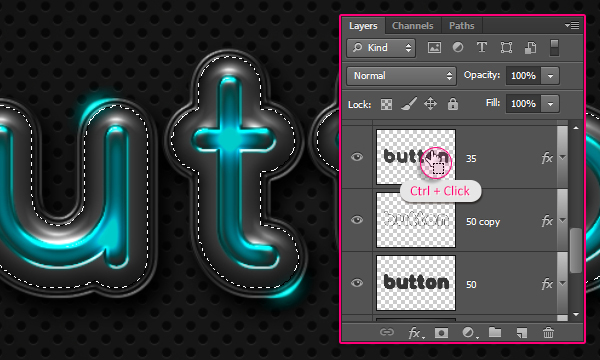
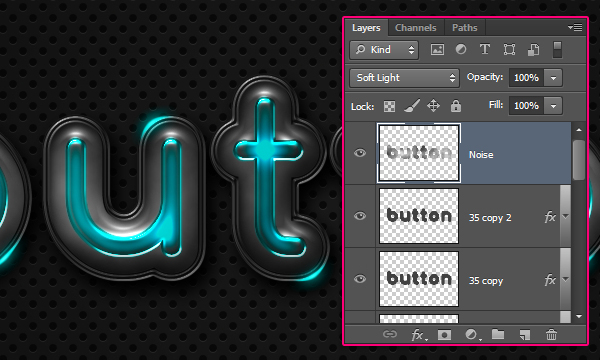
Ctrl/Cmd + click the “35″ layer’s thumbnail to create a selection.
Create a new layer on top of all layers and call it “Noise”. Set the Foreground and Background colors to Black and White, then go to Filter -> Render -> Clouds.
Press Ctrl/Cmd + D to get rid of the selection.
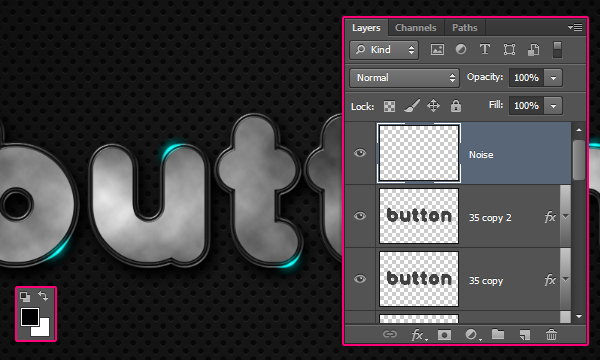
Change the “Noise” layer’s Blend Mode to Soft Light.
Step 15
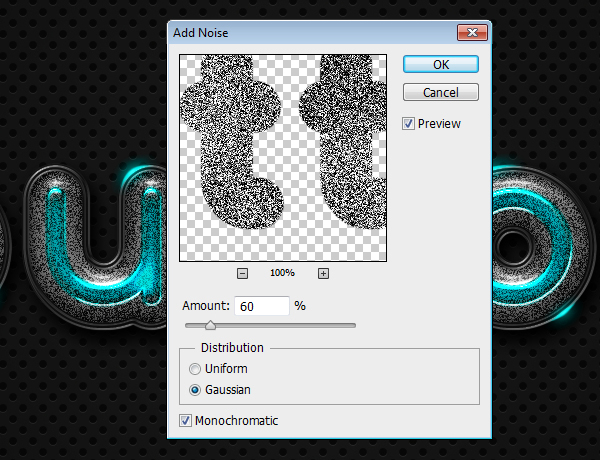
Go to Filter -> Noise -> Add Noise. Change the Amount to 60, the Distribution to Gaussian, and check the Monochromatic box.
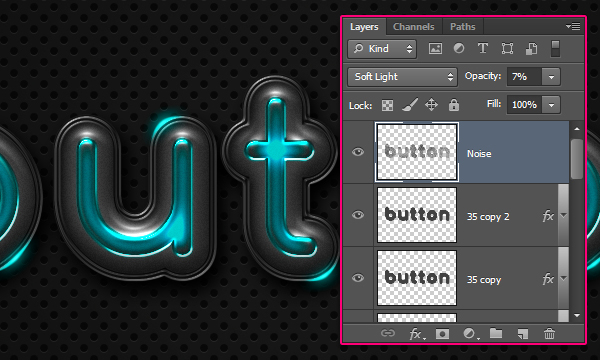
Reduce the “Noise” layer’s Opacity to a value you like. Here, it is set to 7%.


 منذ /06-07-2013, 07:13 PM


 المواضيع المتشابهه


 العرض العادي

